A yard sign is only as reliable as the few inches of steel holding it in the ground. Buyers spend hours on artwork and then lose signs to a Saturday gust because the stake was the wrong size or the sheet was cut the wrong way. Staking is not an afterthought; it is a spec you should decide before the order goes to print. Here is how to get it right the first time.
Match the stake to the sign, not the other way around
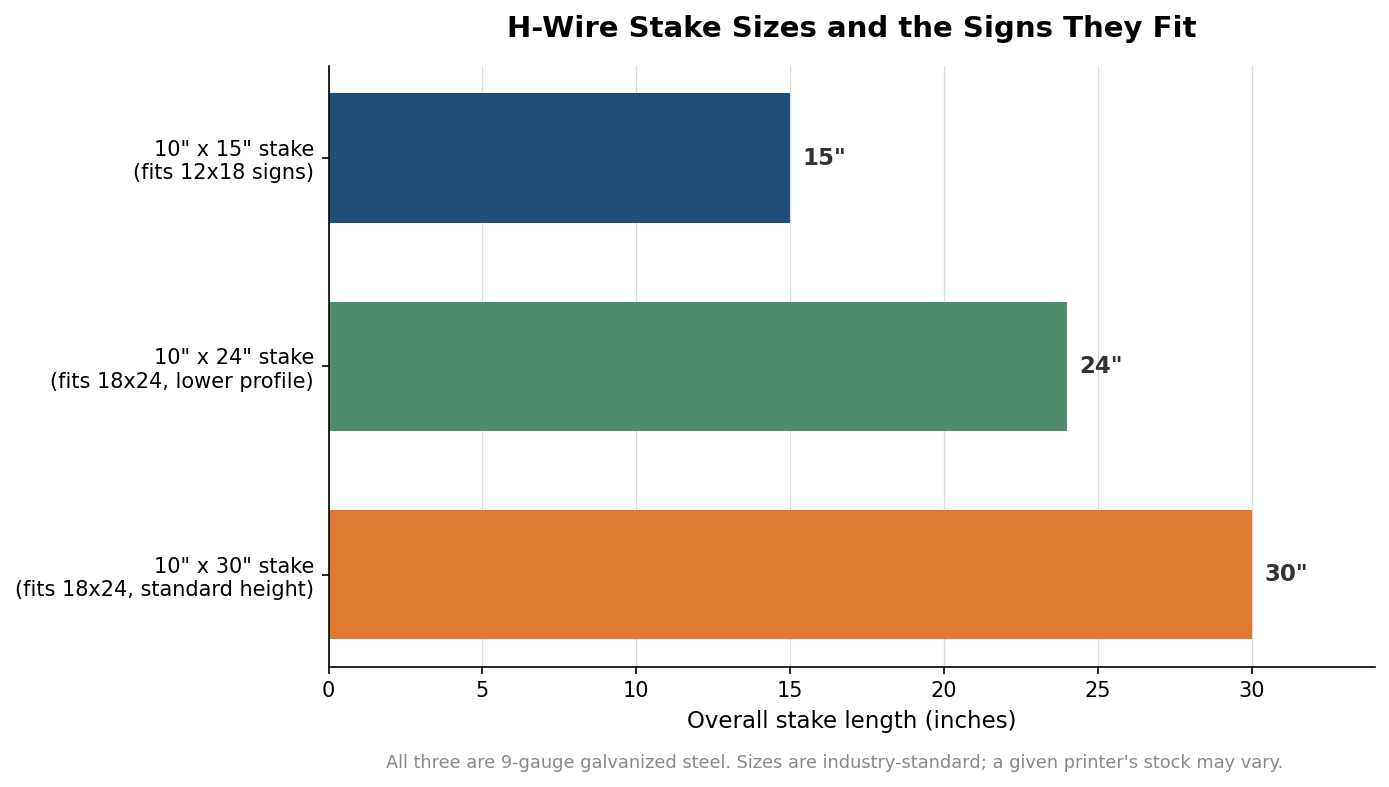
The default hardware for a printed yard sign is the H-wire stake: a galvanized steel frame, usually 9-gauge, shaped like an H so two legs slide up into the sign and a crossbar rests against the bottom edge. These come in three common footprints, described as width by height: 10 by 15 inches, 10 by 24 inches, and 10 by 30 inches. The 15-inch frame suits a smaller 12 by 18 sign or an 18 by 24 sign you want to sit low to the ground. The 24-inch and 30-inch frames both carry the standard 18 by 24 sign, with the 30-inch version lifting it higher for visibility from the road. On the taller frames the crossbar typically sits about 8 inches down from the top, so the wire grips well inside the panel rather than at the very edge.
Height is a trade-off, not a free upgrade. A taller stake raises the sign into sightlines but also hands the wind a longer lever. For an oversized 24 by 36 panel, one thin stake is rarely enough; step up to two stakes or a heavier gauge before you step up in height.
Flute direction is the detail that quietly ruins orders
Corrugated plastic, the material most yard signs are printed on, is not solid. It is two thin skins with hollow channels, called flutes, running between them. Those channels are what an H-stake grips: the wire legs slide up inside them. That only works if the flutes run vertically, top to bottom, on the finished sign. If they run side to side, the legs have nothing to slide into and you are reduced to zip-tying the sign to a fence.
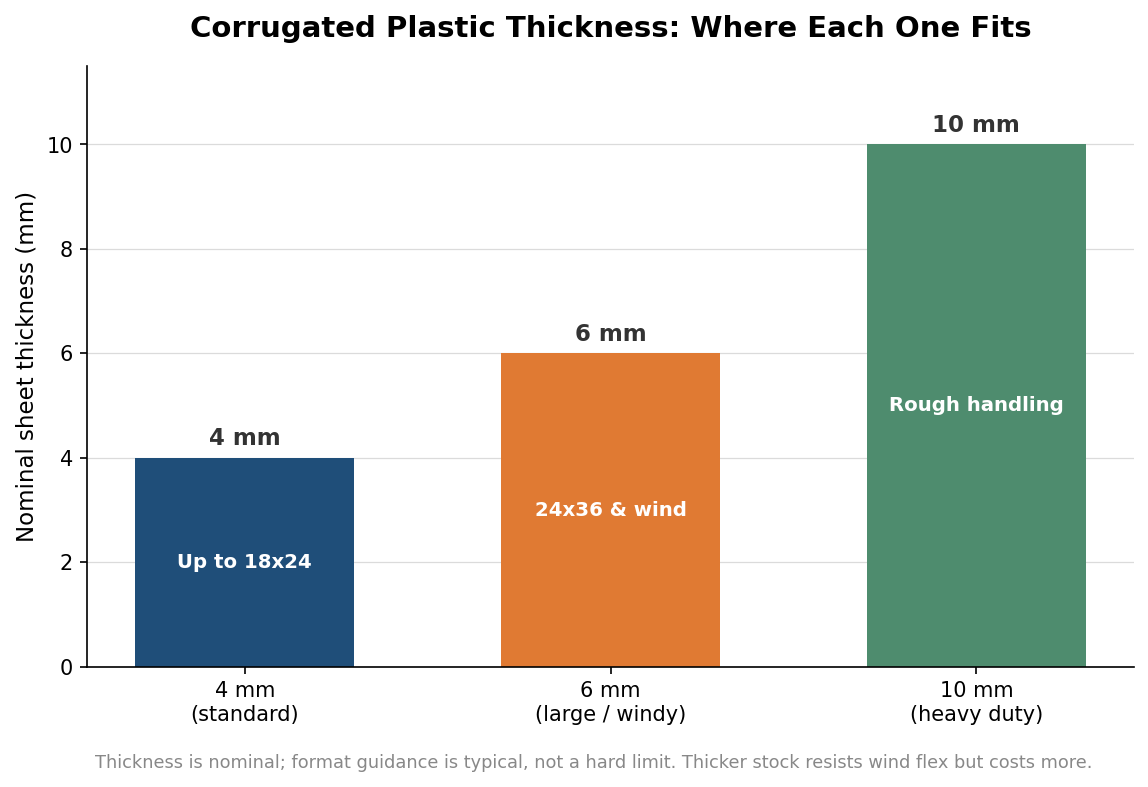
This is why print orders ask you to confirm flute direction, and why the safe instruction is to specify vertical flutes for any sign that will go on H-stakes. It costs nothing to get right and is expensive to discover in the field with a truckload of signs. The base sheet also comes in a few weights: 4 millimeter is the standard workhorse and handles signs up to about 18 by 24, 6 millimeter adds stiffness for larger formats or windy sites, and 10 millimeter is a heavy-duty option for construction and rough handling.
What actually keeps a sign standing in wind
Three things decide whether a sign rides out a storm: how deep the stake goes, how many stakes carry the load, and how much sail area the panel presents. Drive the stake in far enough that a good portion of its length is below grade; a stake pushed in only a couple of inches will pivot out of soft ground the first time it is loaded. For anything larger than a standard sign, or any exposed corner lot, use two H-stakes rather than one, set slightly splayed so they resist twisting as well as tipping.
It is tempting to reach for the tallest, heaviest stake in windy conditions, but that often backfires. A very tall frame gives the wind more leverage, and a taller sign simply catches more air. In genuinely exposed spots, a standard-height stake in thicker 6 millimeter stock is usually steadier than a tall stake in thin 4 millimeter. Double-sided printing is worth a thought here too: a two-sided sign reads from both directions but presents a full face to the wind no matter which way it blows, so it earns the sturdier setup.
One honest caveat on the material itself. Corrugated plastic is built for temporary campaigns. Under constant sun the polypropylene slowly turns brittle, and a realistic outdoor life is on the order of 60 to 90 days for a typical run rather than years. If the sign needs to stand for a full season or longer, that is a signal to move to a thicker sheet or a more durable substrate, not just a bigger stake.
Ground type changes the whole calculation
The same stake behaves very differently depending on what you push it into. In soft or wet soil, insert the stake at a slight backward lean and go deeper than you think you need, because saturated ground loses its grip fast. In dry, compacted, or rocky ground, start a pilot hole with a screwdriver or rebar so you are not bending the wire trying to force it. Frozen ground in winter is its own problem and usually calls for a pilot hole or a heavier goal-post style base. On pavement or indoor floors there is no ground to grip at all, so plan for an A-frame or a weighted base instead of wire stakes, and order the sign flat rather than fluted for stakes.
A short spec sheet to hand your printer
When you place the order, the four things worth stating explicitly are the sheet weight, the flute direction, the stake size, and the stake count. A workable default for a standard lawn campaign is an 18 by 24 sign on 4 millimeter stock with vertical flutes, paired with a 10 by 30 inch H-stake. For exposed sites, larger formats, or anything that has to last past a couple of months, move to 6 millimeter stock and two stakes, and drop the display height rather than raising it. Decide those four numbers up front and the signs will still be standing when the campaign ends, which is the only performance metric that matters.